Instructions and Overview of the Kepler Build System.
Feature list and instructions for the Kepler build system.
Overview
To quickly build Kepler, you may only need to read the shorter Kepler Build System Summary or Kepler and Eclipse
page.
The information below is the complete description of the Kepler Build System.
Contents
- Current Features
- Assumptions
- Removing the .kepler Cache
- Downloading the Build
- Retrieving Kepler and Ptolemy
- Running Kepler
- Running a Workflow from the Command Line
- Setting System Properties
- A Few More Commands Associated With Running
- Creating Jar Files
- Switching Between Distributions
- Generating Project Files for Your Favorite IDE
- Making Your Own Modules
- Storing Your Own Modules in Version Control
- Updating
- Testing
- Using a Separate Class Loader for a Module
- Modifying Ptolemy Includes and Excludes
- Cleaning
- Operating System Specific Extensions
- Modules and Environment Variables
- Command Line Execution Scripts
- Running and Building from Branches
- Updating source copyrights
- Creating installers for Kepler
- Operating Specific Extensions
- Creating your own suite in a remote repository
Current Features
The current manifestation of the new build system has the following features implemented.
(1) The ability for a new developer to get up and running with a particular distribution of Kepler with only three or four commands, depending on whether they want project files for their favorite IDE to be generated.
(2) Support for multiple modules, including code overrides.
(3) Support for multiple class loaders, which allows different modules to use different versions of the same jar.
(4) Integration with Subversion to download and manage modules stored in one or more Subversion repositories.
(5) The ability to store modules in any repository or only locally, with less built-in support for non-Subversion repositories.
(6) Optional management of modules across multiple projects on the same developer machine using a module registry.
(7) The ability to switch from one distribution of Kepler to another with one command.
(8) The ability to record and retrieve the precise modules that are expected in a particular distribution.
(9) The ability to manage multiple versions of the same module across projects.
(10) Support for native code libraries.
(11) Support for the automatic generation of projects for Intellij IDEA, Eclipse, and Netbeans.
(12) The ability to read in module-specific system properties.
(13) The ability to compile, jar, and run Kepler and its associated modules.
(14) The ability to clean compiled code, kars, the module registry, and IDE project files.
(15) The ability to run JUnit tests in a particular module or set of modules.
(16) The ability to run a particular workflow test or set of workflow tests in a particular module or set of modules.
(17) The ability to produce Javadoc for a particular module or set of modules.
Assumptions
- You are running Java 1.8. To test this assumption type: "java -version"
- You are using Ant 1.8.2. To test this assumption type: "ant -version"
- You have installed Maven 3.0.3 or newer. To test this assumption: "mvn --version"
- You have installed an SVN client, v1.6. To test this assumption type: "svn --version"
- For development with Eclipse these have been tested with Eclipse Ganymede and SVN 1.5.5,
with Subclipse 1.4.7.
Removing the .kepler Cache
Important: Currently, to switch between kepler-1.0.0 and the devel tree, you must remove the .kepler cache. If you don't do this, then there will be no actors in the actor pane! Enter the following command:
ant clean-cache
Downloading the Build
The first step in using the Kepler Build System is to download the latest version from the repository. To do so, you will want to create a new directory and then execute the svn checkout (co) command as in the following example,
mkdir kepler
cd kepler
svn co https://code.kepler-project.org/code/kepler/trunk/modules/build-area
cd build-area
kepler is the name of the directory where the build will be stored, as well as the modules you will be working on. Any well formed directory name may be used, but directory names with spaces may or may not work.
Note that to build kepler-2.5 a different build-area must be checked out:
svn co https://code.kepler-project.org/code/kepler/releases/release-branches/build-area-2.5 build-area
Retrieving Kepler and Ptolemy
Now that the build system is downloaded you will use the build system to retrieve Kepler and Ptolemy.
First, you need to decide whether you would like to work with the latest version of Kepler (referred to as the "trunk" of Kepler), or whether you would like to work with the 1.0.0 version of Kepler that was released in May of 2008
To work from the trunk issue the following command:
ant change-to -Dsuite=kepler
To retrieve Kepler version 1.0.0
ant change-to -Dsuite=kepler-1.0
Some explanation of what the "ant change-to" command is doing:
What is actually first retrieved is something known as a suite (more on that later). This suite contains information on where to retrieve the desired versions of Kepler and Ptolemy and that information is used by the system to then retrieve the appropriate versions of Kepler and Ptolemy. By default, when you type ant get -Dsuite=kepler, you are making a request for a particular suite named kepler, which has information on how to download Kepler and Ptolemy.
A final note, when you do get -Dsuite=suite.name you retrieve not only the suite, but all the modules that are associated with the suite as well. If you want to retrieve a single module instead of a suite of modules, you just type ant get -Dmodule=module.name instead.
To build Kepler 2.5, use (again note this must be from the 2.5 version of build-area):
ant change-to -Dsuite=kepler-2.5
Note:
If you are behind a firewall and the svn port (port 3690) is blocked and you are working off the trunk, then the download of ptolemy will fail when you execute the "ant change-to -Dsuite=kepler" command. To check if port 3690 is blocked, use telnet source.eecs.berkeley.edu 3690.
If the svn port is not blocked, you will see:
bash-3.2$ telnet source.eecs.berkeley.edu 3690
Trying 128.32.48.234...
Connected to source.eecs.berkeley.edu.
Escape character is '^]'.
( success ( 2 2 ( ) ( edit-pipeline svndiff1 absent-entries commit-revprops depth log-revpro\
ps partial-replay ) ) )
If the svn port is blocked, you will not get the "success" message, you will see something like
bash-3.2$ telnet source.eecs.berkeley.edu 3690
Trying 128.32.48.234...
telnet: connect to address 128.32.48.234: Connection refused
telnet: Unable to connect to remote host
If the svn port is blocked, you must download ptolemy manually using the following command:
svn co https://repo.eecs.berkeley.edu/svn-anon/projects/eal/ptII/trunk kepler/ptolemy/src
However, if you have this issue and you are using kepler-2.5 instead of the trunk, you must download the ptolemy-kepler-2.5 branch after you execute the "ant change-to -Dsuite=kepler-2.5" command:
mkdir -p ../ptolemy-kepler-2.5/src
svn co https://repo.eecs.berkeley.edu/svn-anon/projects/eal/ptII/branches/kepler-2-5 ../ptolemy-kepler-2.5/src
Running Kepler
Now that you have downloaded the Kepler Build System and have used it to retrieve the Kepler version that interests you, you are ready to run. Just type:
ant run
Note that it would be possible for a new user to get started without having to enter a command between get and run by chaining these commands in ant. So, for example, if you wanted to download and run Kepler from the trunk all in one command, you could type:
ant change-to -Dmodule=kepler run
Running a Workflow from the Command Line
There are three commands for running workflows from the command line.
1.) To run a workflow from a file named "workflow" with both the gui and the cache enabled, type:
ant run -Dworkflow=workflow
An alternative is to type:
ant run-workflow -Dworkflow=workflow
2.) To run a workflow without the cache, for example, when you would like to run multiple instances of Kepler at the same time, type:
ant run-workflow-no-cache -Dworkflow=workflow
3.) To run a workflow without loading Swing (meaning that no actors with GUI components may be used in the workflow) and by implication no cache:
ant run-workflow-no-gui -Dworkflow=workflow
The value of workflow in the above examples must include either the relative path or the absolute path in addition to the name of the workflow (unless the workflow is in the working directory).
Finally, your working directory does not need to be kepler/build-area. But if your working directory is elsewhere, you must tell ant where the build file is. For example:
ant -buildfile kepler/build-area/build.xml run-workflow -Dworkflow=workflow
Or equivalently
ant -f kepler/build-area/build.xml run-workflow -Dworkflow=workflow
Note that build-area is either the relative or absolute path to the build-area folder.
You can also run a workflow in a kar file by using the kar file as the workflow argument as so:
ant run-workflow-no-gui -Dworkflow=../test.kar
Setting System Properties
At times, you will want to pass system properties to Kepler. The way to do that is to add variables to a *.properties file in the folder kepler/your.module/resources/system.properties/. For example, the module ppod-actors has a *.properties file
called ppod-gui.properties. The contents follow:
PPOD_SAMPLES_HOME=${project.path}/ppod-actors/resources/ppod/samples
PPOD_USER_HOME=${user.home}/Documents/pPod
Note that before setting the properties inside of the JVM, various substitutions will be made. The absolute path of kepler will be substitutes for ${project.path} while the absolute path of the users home directory will be substituted for ${user.home}. The properties will now be available from anywhere in your Java program by calling the static System.getProperty() method with an appropriate value. So, for example, to get the value of PPOD_SAMPLES_HOME, you can now type System.getProperty("PPOD_SAMPLES_HOME") from anywhere in your program and the value will be retrieved.
You can also set System properties from the command-line with any of the "ant run" commands: run, run-only, run-workflow, run-workflow-no-cache, and run-workflow-no-gui. For example, if you were running a workflow and wanted to feed the value of the environmental variable CATALINA_HOME and wanted it to be available as a JVM system property, you could type (assuming bash shell):
ant run-workflow -Dworkflow=workflow -Dproperties=CATALINA_HOME=$CATALINA_HOME
In your code, the value of CATALINA_HOME could now be retrieved with a call to System.getProperty("CATALINA_HOME").
Compilation
In most cases, you will just be interested in running the project. In those cases, the compilation of the code will be done for you automatically, and you do not have to concern yourself with the details. However, in some cases, you may wish to perform compilation separately from running the code. This is easy enough:
To compile all the modules in modules.txt, type:
ant compile
Creating Jar Files
To create one jar per module listed in modules.txt (the jars will be stored in module/target), type:
ant jar
Switching Between Distributions
One of the major new features of the new build system is its ability to support multiple distributions which may or may not modify core functionality within Kepler, and which are designed to work with a particular set of modules, including particular versions of those modules which are said to be compatible. For our purposes, a suite is defined as a set of modules, typically but not necessarily including Kepler and Ptolemy, that are intended to work together and which have a particular priority defined between them. A module has a name and a version. Suites can be contrasted with source modules, which contain the actual source code and libraries that will be built. More on that later. For now, it is sufficient to know that there are suites in the system, and that they each defines a set of compatible modules that developers might like to work with.
To change from kepler-1.0 to the pPod distribution, type the following:
ant change-to -Dsuite=ppod
In general, to change to a different distribution, you type the following.
ant change-to -Dsuite=suite.name
Generating Project Files for Your Favorite IDE
Currently, the build system supports automatic generation of project files for three major Java IDE's, namely Intellij IDEA, Eclipse, and NetBeans. Of those three IDE's, the build system currently provides the best support for Intellij IDEA and the least support for NetBeans. Those who are intimately associated with the Kepler project as developers are eligible to receive a free license for Intellij IDEA, which normally costs $599 for commercial users. The commands to generate project files are quite straightforward: for Intellij IDEA, type ant idea, for Eclipse, type ant eclipse, and for NetBeans type ant netbeans. All of these commands will generate general project files as well as files for all of the modules specified in modules.txt.
Using Intellij IDEA
- Type ant idea.
- Open kepler.ipr (which should be associated with Intellij) which exists in the kepler directory.
Using Intellij IDEA with different versions of Kepler
- Select Run->Run... from the menu or push the green arrow button.
- To change the distribution of Kepler you are running, simply choose to use the class path from the module with the highest priority in the appropriate suite. So, to run ppod, make sure that ppod-actors is selected (because it is the highest priority module in ppod) in the drop down list labeled Use classpath and JDK of module: and hit enter to activate the Run button in the dialogue. To run comad instead, simple make sure that comad is selected instead of ppod-actors. Please note that if you want to switch between distributions that are not subsets of each other, you must run "ant change-to" and "ant idea" and reopen Intellij IDEA.
- To debug and have an opportunity to use Intellij IDEA's excellent debugging tools, do the same thing as run, only instead of selecting Run->Run... select Run->Debug... and make sure that the appropriate module is selected in the classpath drop-down list.
Using Eclipse
See Kepler and Eclipse for more detailed instructions. However, in most cases, these instructions should be adequate.
- Type ant eclipse.
- Open Eclipse in a new or existing workspace.
- Choose File->Import... Under the General folder, choose Existing Projects into Workspace. Click Next.
- Click Browse right next to the Select root directory: field. Go to and select the directory where you saved the build and downloaded your modules, which is typically called kepler. Click Choose.
- The projects that were generated will be automatically detected by Eclipse. Click on Finish.
- KarDoclet.java uses doclet code from tools.jar. If you are using Java 1.8, you will need to add tools.jar to the list of external jars:
Windows -> Preferences -> Java -> Installed JREs
Select the default JRE -> Edit -> Add External Jars -> [Path to JDK]/lib/tools.jar
If you have the Subversive Eclipse plugin installed you can select the newly generated projects, right click on them and choose "Share Projects" and follow the instructions in the wizard to set up the connection to the Kepler repository (https://code.kepler-project.org/code/kepler/). Repeat the process for the ptolemy project using the Ptolemy repository.
If you have the Subversive plugin installed, see Updating the local copy of the Kepler sources
Using Eclipse with different versions of Kepler
To run different flavors of Kepler in Eclipse, a little bit more work is needed than in Intellij IDEA. Let us consider the example of running kepler-1.0 Kepler versus the pPod distribution again.
For a first example, let us look at running the "ppod" suite. First, as you can imagine, you need to have first run "ant change-to -Dsuite=daks-base" followed by "ant eclipse" and opened the Eclipse project as detailed above.
Let us say you want to run ppod:
- Right click on ppod-actors (because it is the highest priority module in the ppod suite) and select Run As->Run Configurations...
- Click on New launch configuration button (it is the little document with a + on it in the upper left corner).
- Name the configuration "ppod" (you can use any name you want, but using the same name as the suite would probably be most clear.)
- Enter "org.kepler.Kepler" in the Main class: text field.
- Click Apply and then Run.
Now imagine that instead of ppod, you want to run comad. Do the following:
- Right click on comad (because it is the highest priority module in the comad suite) and select Run As->Run Configurations...
- Click on New launch configuration button.
- Name the configuration "comad."
- Enter "org.kepler.Kepler" in the Main class: text field.
- Click Apply and then Run.
From this point forward, you can easily run either ppod or comad. To run these, do not select the run button. Instead, select the little black arrow that is pointing down and which is just to the right of the run button and choose the appropriate launch configuration from the choices presented. To debug, do the same thing. Select the little black arrow that is pointing down and is just to the right of the debug button, not the debug button itself.
Using Eclipse with JNI
If you use any of the built-in JNI actors, such as those associate with GARP, you need to set the java.library.path VM argument. In general, if you get an error that complains about java.library.path, you may need to complete these steps. To set the java.library.path, follow these steps:
- Open your Run Configuration.
- Select the Arguments tab:
- Enter the following in VM arguments:
-Djava.library.path=${project_loc}/../common/lib
Using NetBeans
Out of the three IDEs, NetBeans currently is a little more cumbersome to use. I will be exploring alternative means of support in the near future. In the meantime, here are the instructions. First, as usual, type ant netbeans and open up NetBeans. Select File->Open Project... and browse to the directory where the modules were downloaded (typically kepler) and select all the of the relevant module folders for your project (including build-area) and push the Open Project button. You can ignore the exclamation point next to the kepler module.
To run different suites, simply select the highest priority module in the suite you want to run and make it the main project. To do this, just right click on the module and choose Set as Main Project. If the module that you set as the main project has the main class that you wish to run, you can simply hit the the run button and then select the appropriate class from the dialogue that results to run that distribution. Otherwise, you need to specify the main class you wish to run manually. So, for example, if you want to run kepler, you can just set the loader module as the main project, click on the run button, and select org.kepler.Kepler as the main class and run. You can do this because the main class you want to run is in the loader module. In contrast, if you want to run ppod, you would set ppod-actors as the main project (since it is the highest priority module in modules.txt in the ppod suite). Unfortunately, ppod-actors does not have the main class you wish to run (which in this case would be org.kepler.loader.Kepler) so you need to set this manually. To do that, right click on ppod-actors, select Properties, choose the Run category, and enter org.kepler.Kepler in the Main Class: text field. After you do that, you are ready to go, just click on the run button.
To debug or profile instead, just click the debug or profile buttons respectively instead of the run button after following identical preparation steps.
Making Your Own Modules
If you want to extend Kepler without modifying the core of Kepler (which will impact everyone using the particular branch of kepler that you modify) you will want to make your own modules. There are two types of modules you can make. You can either make suites or source modules. A suite is a module that contains information on the locations, versions, and locations of all the modules that constitute a particular version. A source module, as its name suggests, contains the actual source code, including associated resources and third party libraries which all belong together as a logical unit. You can make these modules in one of two ways. You can make them manually by following the conventions and manually creating appropriate directories and files or you can create them automatically. Please note that, a module can be both a suite and a source module. An example of such a module that already exists is comad.
To automatically make a suite named "suite.name", type:
ant make-suite -Dname=suite.name
To automatically make a source module named "module.name", type
ant make-module -Dname=module.name
Now that you have created the beginnings of each these modules, you will want to develop these modules according to the guidelines below:
Suites
A suite consists of nothing more than information concerning the modules, including particular versions and locations, that will appear in a particular distribution. Making a suite is what allows you to get commands like ant get and ant change-to working with your particular distribution. Please note that for a suite to enable these commands in the current system, it must be uploaded to https://code.kepler-project.org/code/kepler/trunk/modules/.
More specifically, a suite must have two things. It must have a module-info directory, and it must have modules.txt file in that directory. The best way to see what these two files contain is to look at an existing suite, such as ppod. The file modules.txt contains nothing more than a listing of module and suite names contained in the distribution, from highest priority to lowest priority. What this means is that if a class definition or an identical resource is found in both a higher priority and a lower priority module, the class definition or the resource from the highest priority module will be what is actually used. Optionally, if one of the modules you use is not stored in the same repository as Kepler, you can specify the url of a Subversion repository immediately after the name. Examples follow:
Example 1: modules.txt in pPod:
ppod-actors
ppod-gui
provenance-apps
*comad
Example 2: Here is an example of a modules.txt file that uses a url to refer to an outside Subversion repository:
amber	svn://pantara/extensions/amber/trunk
ppod-actors
cacheviewer
*comad-merge
Example 3:
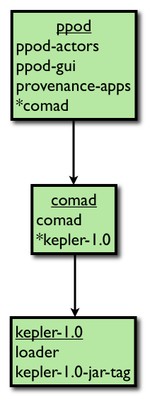
Note that some listings in modules.txt are preceded by a *. This is a reference to a suite. Let us look at the pPod example:
Consider the following three files:
ppod/modules-info/modules.txt
ppod-actors
ppod-gui
provenance-apps
*comad
comad/modules-info/modules.txt
comad
*kepler-1.0
kepler-1.0/modules-info/modules.txt
loader
kepler-1.0-jar-tag
If you issue the command "ant change-to -Dsuite=ppod" then the contents of ppod/module-info/modules.txt is copied into build-area/modules.txt. But this file references the contents of other suites. The resulting set of modules would consist of the following:
ppod-actors
ppod-gui
provenance-apps
comad
loader
kepler-1.0-jar-tag
Note that one can think of suites which contain other suites as forming a tree. For example, imagine that X, Y, and Z were hypothetical modules where the modules.txt from X was selected and whose contents follow:
X:
A
B
C
*Y
*Z
Y:
D
E
Z:
D
F
This could be visualized as the following tree.
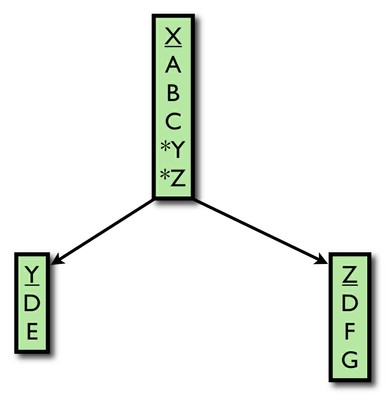
This tree would be traversed in pre-order. The resulting order of modules would be:
A
B
C
D
E
F
G
Note that even though module D is specified twice, it only appears in the resulting list once at the highest priority possible.
None of the suites in the system currently reference more than one suite, so this hypothetical is provided so that you know how it is handled. The ppod suite above would be a "tree" with only one branch:
Source Modules
A source module typically consists of source code, whether written in Java or another language, resources, and third-party libraries. The build system defines several conventions regarding how these things should be stored. Basically, the build system follows Maven conventions. Source code should be stored in src, resources in resources and jar files in lib. Native libraries that need executable permission should be stored in lib/exe. The system will automatically ensure that files stored in that directory will be executable, as long as the module loader is included as a module in your suite. When you compile code, the classes that are created are stored in target/classes, and when you create a jar out of your module that jar is stored in the target directory with the name module.name.jar. Finally, it should be noted that it is possible to load system properties into the system when you are using the loader module. To do so, simply store a file ending with the extension .properties in the folder resources/system.properties. Note that currently you can include two special variables as system properties. ${project.path} refers to the directory where the modules where downloaded, typically kepler, while ${user.home} refers to the users home directory. Examples of properties files in action can be found in ppod-actors and ppod-gui by clicking on the links here and here respectively.
Storing Your Own Modules in Version Control
After you have created a module either manually or using the commands ant make-suite or ant make-module you will probably want to add them to a version control system. Currently, the build system only supports Subversion version control systems. Please note, modules stored in another version control system can be used with the build system. The only difference is that you will have to retrieve and manage your modules manually or using tools other than the build system.
If you would like to store your module in our version control system at https://code.kepler-project.org/code/kepler/ and you have write permission, there is an ant command to add your module automatically. All you have to do is type the command:
ant upload -Dmodule=module.name
You will be prompted for your SVN username and password and the module should upload.
Note: This may not work with some subversion command-line clients. If that is the case, you will have to import manually according to the requirements of your SVN client.
Releasing and Patching
Updating
When updating, there is the power to update all the modules in your suite at once as and there is the power to specify subversion type dates and times.
For example, right now you could specify:
ant update -Drev={2009-5-26}
This will roll back the system to the last update before May 26, 2009.
Now there is an alternative, more convenient syntax for the same result:
ant update -Ddate="May 26"
This will do the same thing. Note that the year 2009 is implied but could be included if you want:
ant update -Ddate="May 26, 2009"
There are many alternative ways to specify the same thing. For example, you could specify this with the following ways:
ant update -Ddate=2009-5-26
ant update -Ddate=5-26-2009
ant update -Ddate=5-26-09
ant update -Ddate=5-26
ant update -Ddate="May 26, 2009"
ant update -Ddate="May 26, 09"
ant update -Ddate="May 26"
ant update -Ddate="26 May 2009"
ant update -Ddate="2009 May 26"
ant update -Ddate="26MAY2009"
ant update -Ddate="2009MAY26"
Finally, note that whenever the month is specified, the case does not matter. Also, months like March can be specified as mar, Mar or MAR while February could be specified feb, Feb, or FEB and so on. Basically, there are a lot of different ways to specify the date.
Finally, just as in subversion you can specify the hour, you can do so using the date attribute as well. For example, to get everything committed before 1:00 p.m. (Pacific Time, because that is where the server is) on May 26, 2009 you could type:
ant update -Drev={2009-5-26T13:00}
Alternatively, this could be specified as:
ant update -Ddate="May 26 13:00
"
Testing
Assumption:
- You have ANT_HOME defined so that junit-4.5.jar can be copied to your ANT_HOME/lib directory if it does not already exist there.
All Junit tests should be stored in the the tests/src folder of the module for which the tests are designed. All test workflows should be stored in test/workflows for the module. An example of a module that follows these conventions is comad.
There are three commands that you can use for testing:
(1)
ant test
With respect to this first command, by default, it runs all the JUnit tests for all of the modules defined in modules.txt. However, it is also possible to select only one test to run by specifying the name of a particular test class (without the package).
ant test -Dname=test.name
So, for example, in the comad module there is a test called org.kepler.actors.TestStatelessGenericActor. To run only this test, you would type:
ant test -Dname=TestStatelessGenericActor
Note: Right now, if there were multiple tests across multiple modules with the same name, they all would be executed by this command. Also, if within the same module, you had classes with this same name but different packages, they all would be executed. This command will be made more precise upon a showing of sufficient user demand, but for now we have opted for maximal simplicity in specifying the name of the class.
(2)
ant test-workflows
This command runs all the test workflows for all the modules defined in modules.txt.
(3)
ant test-workflow -Dname=workflow.name
A brief discussion of the last command is necessary. If you specify the name of a workflow test, the system will find that workflow in the highest priority module for which it is defined. However, very rarely, you may have a workflow test of the same name in a lower priority module that you want to execute instead. In that case, you can specify the name of the lower priority module.
ant test-workflow -Dname=workflow.name -Dmodule=lower.priority.module
Using a Separate Class Loader for a Module
In some situations, you will want to use a different version of a jar file than is used in the lower priority modules that you depend on. In those cases, you will need to use a different class loader for your module. This is not difficult. All you need to do is include the name of the module that needs a separate class loader in the file classloaders.txt in the build-area folder and make sure that the module multiple-class-loaders is the highest priority module in the suite you are working on.
If you go this route, you should be aware of a few limitations.
First, it is not possible for your module to share objects of the type defined in the special jar file that motivated you to use your own class loader in the first place without serializing the object into more basic parts. That is, if you wanted to use version 2 of A.jar instead of version 1 of A.jar which is used in the other modules you depend on and there was a type X defined in both versions of A.jar, you would not be able to pass around objects of type X between your module and other modules in the system without using serialization.
Second, overrides are more limited. If you override a class in another module, you will also have to override all of its parents up the hierarchy (not including basic Java types, however). Not only that, you will have to override all of the children of those parents. In short, if you use a custom class loader for a particular module, you will have to be more cautious about your overrides. If you override something that is in an involved class hiearchy, you may have a lot of work on your hands. For this reason, you probably should consider defining another module that does not use its own class loader to perform these sorts of overrides, and delegate any special work that this module needs to the module that does have the special class loader. In this way, you can get the both of the best worlds. You get simple overrides, and you can use your own version of jar that already exists in the system.
Modifying Ptolemy Includes and Excludes
See Update Ptolemy Third Party Packages.
Cleaning
There are various clean commands that you will want to use from time to time:
- ant clean
- Deletes the target directories (which contains both jars and classes) for all the modules specified in modules.txt.
- ant clean-module -Dmodule=module.name
- Deletes the target of the specified module.
- ant clean-kar
- Deletes all the .kar files that have been built.
- ant clean-jar
- Deletes all the .jar files in the target directories of all the modules specified in modules.txt.
- ant clean-cache
- Deletes your .kepler directory
- ant clean-idea
- Deletes Intellij IDEA project files.
- ant clean-eclipse
- Deletes Eclipse project files.
- ant clean-netbeans
- Deletes NetBeans project files.
Updating Source Copyrights
The build system allows you to update the copyright statements in a single source file, all source files for a module, or all source files for a suite. The command is 'ant update-copyright'. The arguments are:
- copyrightFile: the file to read the copyright information from. It should be located in build-area/resources/release. This file can include the token $year$ which will be replaced with the specified copyrightYear
- copyrightYear: the year string to insert into the copyright text.
- module: the module to update
- file: a specific file to update. Note that if file is specified, even if module is specified, only the file will be updated.
- dryRun: set to true if you don't want any files changed. The presumed changes will be printed to std.out.
Creating Installers
The build system allows you to create installers for a release of Kepler.
To do so, you must follow the following steps:
- First, you need to change-to the released Kepler suite you want to build installers for. (e.g. "ant change-to -Dsuite=kepler-2.2.0."
- Then you need to update the splash screen and about screens if necessary. For example, say you wanted to make the third release candidate for Kepler 2.2. Then you would use the "change-splash-screen" as follows: "ant change-splash-screen -Dversion="Kepler 2.2 Release Candidate 3."
- Finally, you need to make the installers themselves. Continuing with our example, if you wanted to make installers for the third release candidate of Kepler 2.2, you would use the following command: "ant make-installers -Dversion=2.2rc3." Please note, if you do not want to make installers for all three operating systems, you can use the OS specific installer commands ("make-linux-installers", "make-mac-installers", "make-windows-installers"). The completed installers will be in user.dir/finished-kepler-installers.
The NMI Nightly Build
The NMI Nightly Build system runs a full Kepler build twice daily. It reports via email to kepler-nightly@ecoinformatics.org on whether the build is successful or not. For more specific information on the NMI system see these instructions.
The 'ant nmi' task allows you to build an NMI nightly build configuration set for any given Kepler suite. Here is an example NMI task:
<nmi project="kepler"
     component="kepler"
     componentVersion="${suite}-trunk"
     description="Kepler NMI build for the suite ${suite}"
     runType="build" platforms="x86_macos_10.4, x86_fc_5"
     prereqs="prereqs:apache-ant-1.8.2, prereqs_x86_fc_5:java-1.5.0_08, prereqs_x86_macos_10.4:java-1.5.0_06"
     notify="kepler-nightly@kepler-project.org"
     overwrite="true"/>
You can build an NMI configuration set by using the command 'ant nmi -Dsuite=yourSuite'. You will see a set of files written to build-area/resources/nmi/runs/yourSuite. These configuration files need to be checked into SVN, then Chad, Matt or David needs to be alerted to their presence so the they can be installed on the NMI submit host. For more info, email kepler-dev@ecoinformatics.org.
Operating System Specific Extensions
Some modules require extensions that are specific to an operating system. The build system allows this through the use of the $module/module-info/osextensions.txt file. Here is an example of this file:
org.kepler.osx.KeplerOSXExtension, Mac OS X
org.kepler.osx.KeplerApplicationListener, Mac OS X
The file defines the class and the OS that requires it. Note that the OS name is the name returned from Java when doing a System.getProperty("os.name") call. The build system will automatically compile these classes on the indicated OS and will only attempt to load these classes (via reflections) if the proper OS is running. Any module can have an osextensions.txt file.
Modules and Environment Variables
Some modules need to load specific environment variables in order to function. The build system allows this via the $module/module-info/environment.txt file. The entries in this file look like this:
MY_VAR:Mac OS X=Some/Path/Here
MY_OTHER_VAR=/x/y/z
STILL_ANOTHER_VAR:linux=/some/path/on/linux
Note that the variables can be OS specific or not depending on the addition of the ":os-identifier". The identifier of the OS is a substring of System.getProperty("os.name") so the OS can be made very specific (i.e. "Windows Vista 7.0") or very generic (i.e. "Windows"). If a variable should be loaded no matter what the OS, the os-identifier can be omited.
Command Line Execution Scripts
Command line execution scripts are created via the command 'ant make-startup-scripts'. A kepler.bat and kepler.sh file will be created in the Kepler root directory. These scripts can be used for executing Kepler with command line parameters and switches.
These scripts can also be used to execute a workflow or kar file from the command line. The command looks like:
./kepler.sh test.kar -runwf -nogui
Running and Building from a Branch
Both Kepler and Ptolemy can be built and run from a branch automatically. To run from a branch, first check out the build-area from the branch that you want to run from. Then use the change-to command to change to the suite that you want. To check out from your Kepler branch, use the -Dbranch=... argument. To check out a specific Ptolemy branch, use the -DptolemyBranch=.... argument. See below for an example.
svn co https://code.kepler-project.org/code/kepler/branches/release-2.0.0-pre-alpha1-branch/modules/build-area
build-area

ant change-to -Dsuite=wrp
-Dbranch=https://code.kepler-project.org/code/kepler/branches/release-2.0.0-pre-alpha1-branch
-DptolemyBranch=https://repo.eecs.berkeley.edu/svn-anon/projects/eal/ptII/branches/rel-8-0-beta
Using a Non-Kepler SVN Repository to Build a Suite
The Kepler build system allows developers to use SVN repositories other than the "official" Kepler repository to host their source and resources. To use this feature, follow these steps:
Steps:
1) Establish your own SVN repository
2) Configure your repository so it can be accessed without inputing a password (i.e. with ssh keys).
3) Create a custom suite (see this description).
4) Edit the modules.txt file for your new suite. It should look something like
mynewsuite svn+ssh://localserver/repo/trunk/path/to/mynewsuite
*kepler
5) Create and change to a modules directory
mkdir modules
cd modules
5) Check out your new suite
svn co svn+ssh://localserver/repo/trunk/path/to/mynewsuite mynewsuite
6) Check out the kepler build-area module
svn co https://code.kepler-project.org/code/kepler/trunk/modules/build-area build-area
7) Change into the build-area directory and run the change-to command then the run command.
cd build-area
ant change-to -Dsuite=mynewsuite
ant run
Suite Analysis
Analysis Atvarious times, you may want to analyze the suite you are running with respect to particular properties. For example, you may be interested whether a higher priority module is overriding a class in a lower priority module or whether there is any overlap in jars. The build provides various commands for these tasks:
- ant analyze-jars Analyzes the jars in the current suite and identify overlap.
- ant report-overrides Reports all the Java source code overrides in the current suites.
- ant report-all-overrides Reports all the Java source code overrides for all the suites physically present on your local machine.
- ant report-dependencies Reports all of the Java dependencies for all of the classes in all of the classes of the current suite.
