Developing a Hello World Actor using the Kepler Build System and Eclipse
A tutorial about how to develop a simple actor.
Assumptions
For a list of what versions of Java, ant and Eclipse are necessary, see Brief Instructions for Setting up Kepler under Eclipse.
If you have problems, see the Kepler Eclipse Problems section.
Step 1: Retrieve the Build System and Kepler
First, you need to retrieve the build system and some version of Kepler. For the sake of simplicity, this tutorial uses the development version of Kepler.
From the command-line navigate to anywhere on your local system and type the following commands:
mkdir kepler
cd kepler
svn co https://code.kepler-project.org/code/kepler/trunk/modules/build-area
cd build-area
ant change-to -Dsuite=kepler
ant run
This series of commands will retrieve a snapshot of Kepler and run it.
Step 2: Make a New Module to Store Your Code.
Go ahead and shut down Kepler. The first thing you need to do is to make a new module in which to store your actor. While still in the build-area directory, run:
ant make-module-suite -Dname=hello-world
Note that the ../hello-world/module-info/modules.txt file contains:
hello-world
*kepler
For more information about modules.txt, see Making Your Own Modules.
You are ready to go. Just issue the following commands and we will be ready to start writing actor code shortly.
ant change-to -Dsuite=hello-world
ant eclipse
Step 3: Setup Eclipse
Now, you are ready to start up Eclipse and get to work. (The steps below are a summary, see also Kepler and Eclipse for details and troubleshooting.)
- Go ahead and open Eclipse in a new workspace.
- Choose File->Import... Under the General folder, choose Existing Projects into Workspace. Click Next.
-
Click Browse right next to the Select root directory: field. Go to and select the directory
keplerdirectory that was created in Step 1: Retrieve the Build System and Kepler above. and downloaded your modules. Click Choose. - The projects that were generated will be automatically detected by Eclipse. (There should be on project for every module in modules.txt). Click on Finish.
Step 4: Code Your New HelloWorld Actor
You are ready to code up your new HelloWorld actor. Start by making a new HelloWorld class.
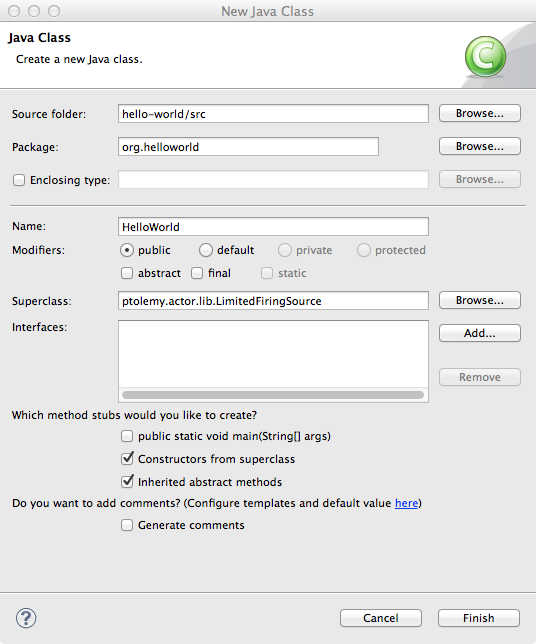
- From Eclipse expand the hello-world module (each module is a separate Eclipse "project"). Right click on src and select New->Class.
- For the package something like "org.helloworld" and for the name specify "HelloWorld"
- For the Superclass, enter "ptolemy.actor.lib.LimitedFiringSource".
- Go ahead and make sure that the check box Constructors from superclass is checked. Select Finish.
Below is a screenshot after right before selecting Finish:
Now you are ready to start adding code to your class. In Eclipse, the HelloWorld pane should look like:
package org.helloworld;

import ptolemy.actor.lib.LimitedFiringSource;
import ptolemy.kernel.CompositeEntity;
import ptolemy.kernel.util.IllegalActionException;
import ptolemy.kernel.util.NameDuplicationException;

public class HelloWorld extends LimitedFiringSource {

	public HelloWorld(CompositeEntity container, String name)
			throws NameDuplicationException, IllegalActionException {
		super(container, name);
		// TODO Auto-generated constructor stub
	}

}
Next, add a public data members for your class to use. The parameter code should be inserted below the HelloWorld constructor, after the closing curly bracket of the constructor. Also, note that you inherit from LimitedFiringSource a data member called "output."
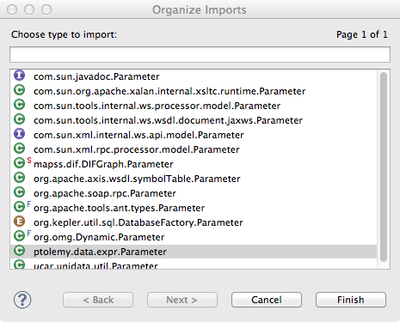
public Parameter username;
After this, you can select Source->Organize Imports to quickly add the imports to the class. If you are prompted to choose a class, choose ptolemy.data.expr.Parameter. Below is a screenshot of the Organize Imports window:
Now, you are ready to fill out the body of your constructor, where traditionally data members are initialized it. Go ahead and initialize the values of output and username with the following code.
output.setTypeEquals(BaseType.STRING);
username = new Parameter(this, "username", new StringToken(""));
Once again organize the imports and ensure that all of the imports come from Ptolemy. If you are prompted to select a type, select ptolemy.data.type.BaseType and ptolemy.data.StringToken.
Having made the constructor which is called when a new HelloWorld actor is constructed, we are ready to implement the fire() method, which is the place where actors "do things." The fire() method of the actor will be called according to the algorithm implemented by the director. (Note, that since the constructor is only called once, for tasks that should occur once with every run of a workflow, the code should be put in the initialize() method.)
The fire() method is declared in the ptolemy.actor.Executable interface. The ptolemy.actor.Actor interface extends the Executable interface. The first class in the hierarchy that implements the fire() method is ptolemy.actor.lib.Source.
Anyway, to override the fire method:
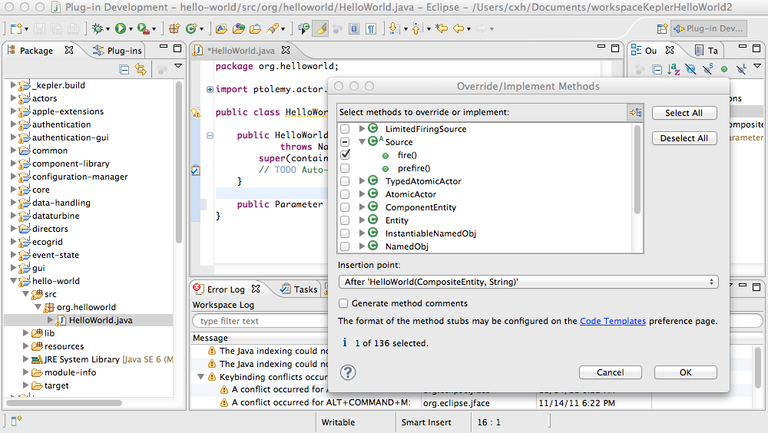
- Right click the code window below where the username Parameter is set and select Source->Override/Implement Methods...
- Check the check box next to the fire() method in the Source class. Note: If your actor already has a fire() method, then Eclipse will not show you the fire() method under the Source class.
- Select OK.
Below is a screen shot:
Within the fire() method after super.fire() add the following code.
String usernameStr = ( (StringToken)username.getToken() ).stringValue();
output.send(0, new StringToken("Hello " + usernameStr + "!"));
Note that this code simply converts the token retrieved from the username Parameter into a String and sends it to the output port of the actor.
Your code is now done. As a whole, your actor code should look like the following:
package org.helloworld;

import ptolemy.actor.lib.LimitedFiringSource;
import ptolemy.data.StringToken;
import ptolemy.data.expr.Parameter;
import ptolemy.kernel.CompositeEntity;
import ptolemy.kernel.util.IllegalActionException;
import ptolemy.kernel.util.NameDuplicationException;

public class HelloWorld extends LimitedFiringSource {

        public Parameter username;

	public HelloWorld(CompositeEntity container, String name)
			throws NameDuplicationException, IllegalActionException {
		super(container, name);
		output.setTypeEquals(BaseType.STRING);
                username = new Parameter(this, "username", new StringToken(""));
	}

	@Override
	public void fire() throws IllegalActionException {
		// TODO Auto-generated method stub
		super.fire();
		String usernameStr = ( (StringToken)username.getToken() ).stringValue();
		output.send(0, new StringToken("Hello " + usernameStr + "!"));
	}
}
If you want to develop and use multiple actors, just repeat Step 4 and adding the actors into the same module. You can also have separate modules for the actors, then you need to include the modules in the suite if you want to use them together.
Step 5: Run Kepler Using Your Hello-World Suite
(5) You are now ready to instantiate your actor, but you first need to run Kepler. To do that, you need to run Kepler using your hello-world suite, either from the command-line or from Eclipse. To do that from the command-line is very easy, from the build-area directory, typically kepler/build-area, run:
ant change-to -Dsuite=hello-world
ant run
Note, that you probably don't really need to type in "ant change-to -Dsuite=hello-world" if you have been following this tutorial, because you already changed to it earlier. It is repeated here for conceptual clarity.
From Eclipse, it is also easy to run Kepler using the hello-world suite. Do the following steps:
- Right click on hello-world and select Run As->Run Configurations...
- Click on Java Application in the left hand pane.
- Click on New launch configuration button (it is the little document with a + on it in the upper left corner)
Here's a screen capture of the button:
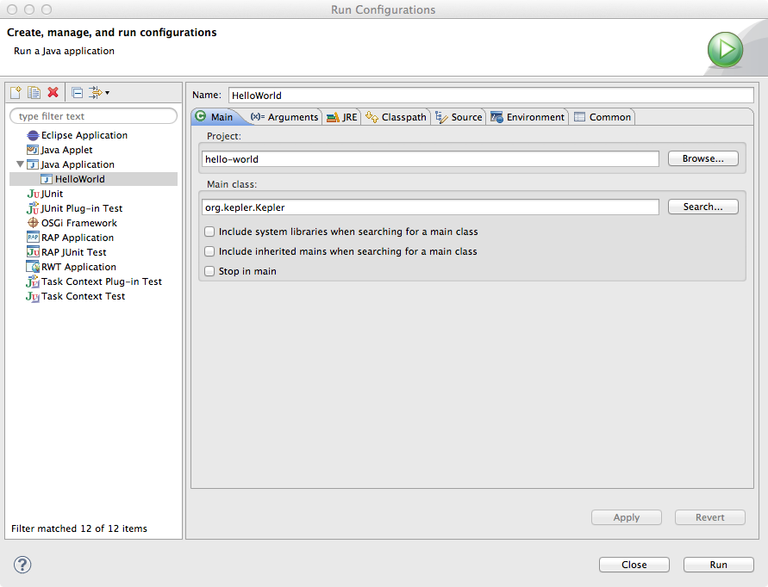
- Name the configuration "HelloWorld" (you can use any name you want, but using the same name as the suite would probably be most clear.)
- Enter "org.kepler.Kepler" in the Main class: text field.
- Click Apply and then Run
Below is a screenshot after Apply was clicked upon:
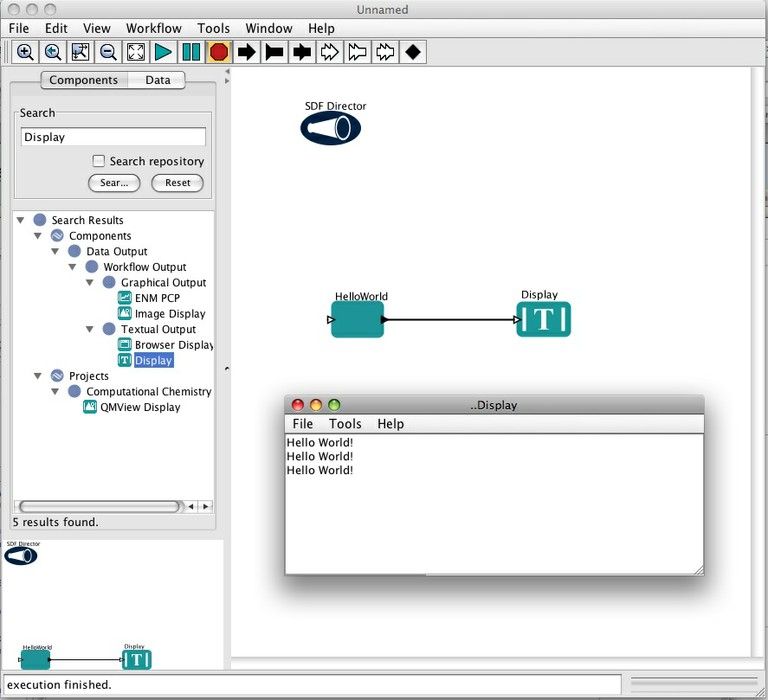
Step 6: Instantiate Your HelloWorld Actor and Build a Basic Workflow
Now that you have Kepler running, you are ready to instantiate your actor and build a basic workflow. Complete the following steps:
- In the Search box, type in "SDF". Drag the SDF Director onto the canvas.
- Select Tools->Instantiate Component and enter in "org.helloworld.HelloWorld" into the Class name: field.
- In the Search box, type in "Display." Drag the Display actor onto the canvas.
- Connect the HelloWorld output port to the Display actor input port.
- Double-click the HelloWorld actor. Enter 3 for the firingCountLimit and "World" (surrounded by quotes) for the username. Click Commit.
- Either click the Run (Ctrl + R) button on the toolbar to execute the workflow. A display should come up with shows Hello World! three times.
Thats it! You have now created and instantiated your own actor and workflow. For your reference, here is a screenshot of what you should see at the end.
For information about optionally adding your actors to the Kepler configuration see Updating the Kepler Directors and Actors. Note that this requires write access to the Kepler subversion repository.
If you have problems, see the Kepler Eclipse Problems section.
