Kepler and Eclipse
How to check out, build, and run the Kepler source code using the Eclipse Integrated Development Environment (IDE).
Below are instructions for setting up Kepler under Eclipse. See the Build System Instructions for other instructions.
Contents
- Brief Instructions for Setting up Kepler under Eclipse
- Detailed instructions for Setting up Kepler under Eclipse
- Problems
Brief Instructions for Setting up Kepler under Eclipse
If you already know Eclipse, SVN, Kepler, and Ptolemy, you may find the hugely abbreviated version of the instructions in this section useful. Details follow in the remaining sections. We recommend using the newest release of Eclipse, these instructions were last validated for Indigo in November, 2011. The basic steps you need to follow are:
- As of April 2016, you must have the Java Development Kit (JDK) 1.8 installed. To test this, run
java -version
- You must have Ant 1.8.2 or later installed. To test this, run
ant -version
- You must have Maven 3.0.3 or later installed. To test this, run
- You must have a Subversion installed. To test this, run
svn --version
- To use Kepler from within Eclipse, you must first check out Kepler from the command line
mkdir kepler
cd kepler
svn co https://code.kepler-project.org/code/kepler/trunk/modules/build-area
cd build-area
ant change-to -Dsuite=kepler
ant clean-cache
ant eclipse
Note that the ant change-to command uses svn to download the rest of Kepler and Ptolemy II, which can take awhile.
Important: Currently, to switch between kepler-1.0.0 and the devel tree, you must remove your ~/.kepler directory. If you don't do this, then there will be no actors in the actor pane! The easiest way is to run ant clean-cache. - Start up Eclipse in a fresh workspace or do File -> Switch Workspace -> Other and enter a new directory into the "Workspace" field.
- In Eclipse, import the project created by running ant eclipse by selecting File -> Import -> General -> "Existing Projects into Workspace" and then browsing to the kepler directory created above, hit Finish. The build may take 10-15 minutes, see Bug 4191.
- KarDoclet.java uses doclet code from tools.jar.
Windows users: if you are using Java 1.8, you will need to add tools.jar to the list of external jars.
Windows -> Preferences -> Java -> Installed JREs
Select the default JRE -> Edit -> Add External Jars -> Path to JDK/lib/tools.jar
where Path to JDK is the location of your JDK, such as C:\Program Files\Java\jdk1.8.0. Path to JDK/lib can be seen under existing JRE system libraries
Mac users usually don't need to do the above step, but if you are using Oracle JDK 1.8.0, then add tools .jar to the list of external jars:
Eclipse -> Preferences -> Java -> Installed JREs
Select the default JRE -> Edit -> Add External Jars -> Path to JDK/lib/tools.jar
where Path to JDK is the location of your JDK, such as /Library/Java/JavaVirtualMachines/1.8.0.jdk/Contents/Home/lib/tools.jar - Under Windows, you may need to removed dependencies on apple-extensions, see Bug 4342.
-
Create a new Java Application Run Configuration by going to Run/Run Configurations. In the main tab set the project to be the suite you want to run, e.g., "kepler", "reporting", etc.", and set the Main class: "org.kepler.Kepler"
- See Developing a Hello World Actor using the Kepler Build System and Eclipse
mvn --version
Detailed Instructions for Setting up Kepler under Eclipse
For the rest of us, the remainder of this document covers the following topics in detail:
- Installing Java
- Installing Ant
- Installing Subversion
- Downloading Kepler
- Downloading Eclipse
- Configuring Eclipse
- Installing Subversion (SVN) into Eclipse
- Import the projects into Eclipse
- Add tools.jar to the list of external jars
- Create a Java Application within Eclipse
- Updating the local copy of the Kepler sources
- Adding an actor
1. Installing Java
Currently, Kepler requires Java 1.8, which is also known as Java 8.
Check your version of java with java -version. You should see something like:
-bash-3.2$ java -version
java version "1.8.0_25"
Java(TM) SE Runtime Environment (build 1.8.0_25-b17)
Java HotSpot(TM) 64-Bit Server VM (build 25.25-b02, mixed mode)
Windows: If your path is incorrect, then under Windows, with bash, to set your path, use something like
export PATH="/cygdrive/c/Program Files/Java jdk1.8.0_25/bin:${PATH}"
If you don't have Java, then install the Java SE JDK from http://www.oracle.com/technetwork/java/javase/downloads/jdk8-downloads-2133151.html.
Note that the JRE will not work, the JRE does not have the javac Java Compiler.
2. Installing Ant
You must have Ant 1.8.2 or later installed. To test this, run
ant -version
To install Ant, download it from http://ant.apache.org/bindownload.cgi.
Windows: Using the cmd prompt or a cygwin bash shell , install the apache ant .tar.gz file. The .zip file does not include an ant script, it includes Python and Perl scripts that are harder to use. To install Ant, see http://ant.apache.org/manual/index.html, or follow these instructions (this example uses the Cygwin bash shell):
cd c:/cygwin/usr/local
tar -zxf /cygdrive/c/Doc*/cxh.NEWTON/Desktop/apache-ant-1.8.2-bin.tar.gz
ln -s apache-ant-1.8.2 apache-ant
cd bin
ln -s ../apache-ant/bin/* .
Windows: Then, set up the environment to find ant and set a few variables. Start -> My Computer -> Properties -> Advanced -> Environment Variables
- Add c:/cygwin/usr/local/bin to the PATH
- Create a new environment variable called ANT_HOME and set it to c:\cygwin\usr\local\apache-ant-1.8.2 (note: use backslashes and no trailing slash)
- Create a new environment variable called JAVA_HOME and set to to the location of your Java Development Kit. For example c:\Program Files\Java\jdk1.7.0_60
- Start up a shell and type ant -version. You should see something like:
Apache Ant version 1.8.2 compiled on December 20 2011
3. Installing Subversion
You must have the Subversion command line tool installed, see http://subversion.tigris.org/. TortoiseSVN will not work, get the svn command line tool. To test this, run
svn --version
4. Downloading Kepler
To use Kepler from within Eclipse, you must first check out Kepler from the command line:
mkdir kepler
cd kepler
svn co https://code.kepler-project.org/code/kepler/trunk/modules/build-area
cd build-area
ant change-to -Dsuite=kepler
ant clean-cache
ant run
ant eclipse
Note that the ant change-to command uses svn to download the rest of Kepler and Ptolemy II, which can take awhile. The ant change-to command can be used to select other configurations, type ant change-to to see other choices.
Important: Currently, to switch between kepler-1.0.0 and the devel tree, you must remove your ~/.kepler directory. If you don't do this, then there will be no actors in the actor pane! The easiest way is to run ant clean-cache.
5. Downloading Eclipse
Eclipse is available from http://www.eclipse.org. You should download the latest version 3 stable version to be able to follow these instructions. They were generated using Eclipse Indigo, which corresponds with version 3.7.1.
Eclipse comes in several varieties, if you are a Ptolemy developer, choose "Eclipse for RCP/Plug-in Developers".
If you are a Kepler-only developer, the "Eclipse IDE for Java EE Developers", will likely work, but these instructions were tested using "Eclipse for RCP/Plug-in Developers".
In October, 2011, we chose Eclipse for RCP/Plug-in Developers. The Eclipse for RCP/Plug-in Developers version includes the plugin development environment (PDE), which is needed by the backtrack facility, which is an optional part of Ptolemy II that allows models to restore their old state. If the version of Eclipse that you install does not have the PDE, then there will be build errors, which can be fixed by excluding ptolemy/backtrack/ from the build. Kepler does not use the backtracking facility, so you may be ok with a different version of Eclipse.
- Mac OS X: Download the .tar.gz file, click on it and then drag the eclipse folder to your Applications folder.
Windows: Unzip Eclipse into your program files directory
Ubuntu: "sudo apt-get install eclipse-platform eclipse-rcp"
- Create a location to store all of your source code and workspace configuration parameters. I use ~/workspace
- Start up Eclipse
6. Configuring Eclipse
Windows: In order to run Eclipse smoothly use the following command line:
% $ECLIPSE_HOME/eclipse -data $WORKSPACE -vmargs -Xmx512M &
$WORKSPACE defines where your workspace directory is. If you omit it, it will default as a subdirectory of your Eclipse installation.
Every option after the -vmargs flags gets passed to the JVM running eclipse. You need to expand the maximum heap size to at least 256MB to run eclipse smoothly.
In Eclipse, under the Project menu, unselect 'Build Automatically'
There will be thousands of errors until the build is configured correctly, so skipping the build will allow you to check out and configure the projects more quickly and efficiently
Some classes will not build unless you configure the compiler to use Java 8. In Eclipse 3 you can do this by going to:
Mac OS X: Eclipse -> Preferences -> Java -> Compiler -> Compliance and Classfiles
Windows: Window -> Preferences -> Java -> Compiler -> Compliance and Classfiles
and specifying the following settings:
Compiler compliance level: 1.8
Use default compliance settings: checked
Generated .class files compatibility:  1.8
Source compatibility: 1.8
Disallow identifiers called 'assert': Error
Under Windows, the versions might be 8.0 instead of 1.8 - Java 8.0 and 1.8 are the same.
7. Installing Subversion (SVN) into Eclipse
There are at least two Subversion plugins for Eclipse, Subversive and Subclipse. Either will work, for a brief comparison, see Subclipse vs. Subversion. The instructions below are for Subclipse. To use Subversive, see Setting up Ptolemy II and Eclipse.
The Subclipse (http://subclipse.tigris.org) Eclipse plugin adds Subversion to Eclipse.
Follow the Subclipse installation instructions. Upgrade users should see the Subclipse update instructions, otherwise the automatic update might not work.
For your convenience, an abbreviated version of the Subclipse instructions are below:
- To download Subclipse, in Eclipse, follow these menus
Mac OS X: Help -> Software Updates -> Available Software -> Add Site
Windows: Help -> Software Updates -> Find and Install -> Search for new features to install -> New Remote Site. - Then enter:
Name: Subclipse 1.4.x (Eclipse 3.2+)
URL: http://subclipse.tigris.org/update_1.4.x
'Mac OS X:'' You will just have a URL entry. - In the Update sites to visit window, select Subclipse 1.4.x (Eclipse 3.2+) (not in ubuntu)
- Click Finish (not in ubuntu)
- In the Search Results window, expand the Subclipse 1.4.x (Eclipse 3.2+) tree and check the box next to JavaHL Adapter, Subclipse and SVNKit Adapter. If you select all of Subclipse, you may need to install other modules. ''Mac OS X:'' JavaHL is not supported? so don't bother installing it?? "Ubuntu:" also select required Subclipse, Subversion Client Adapter
- Click Next or Install, accept the license agreement, click Finish.
- In the "Verification" window, click "Install All"
- In the "Install/Update" window, click Yes.
- You will be prompted to restart Eclipse, please do so.
8. Import the projects into Eclipse
- Start up Eclipse in a fresh workspace.
- Choose File -> Import -> General -> "Existing Projects into Workspace"
- Click Next
- In the Import window, click the Browse button next to the "Select root directory" field and select the kepler directory that was created above and then click Next
- The projects created when ant eclipse should be listed.
- Click Finish. The build may take 10-15 minutes, see Bug 4191.
9. Add tools.jar to the list of external jars
KarDoclet.java uses doclet code from tools.jar. Under Windows, if you are using Java 1.8 or later, you will need to add tools.jar to the list of external jars or else there will be errors in the core package. (Note that it would appear to make sense to add tools.jar before importing the packages above, but adding tools.jar seems to result in errors like "Project 'ptolemy' is missing required library: '\Ptolemy\src\lib\bsh-2.0b4.jar'")
- Windows -> Preferences -> Java -> Installed JREs
- Select the default JRE -> Edit -> Add External Jars -> [Path to JDK]/lib/tools.jar
- [Path to JDK]/lib can be seen under existing JRE system libraries
- Under Windows, you may need to removed dependencies on apple-extensions, see Bug 4342.
To reduce the number of warnings reported by Eclipse, see Lots of Eclipse Warnings below.
10. Create a Java Application within Eclipse
- Open the Run dialog with: Run -> Run Configurations
- In the left hand tree widget, select "Java Application"
- In the Main tab:
Change the Name to kepler
Change the Project to kepler
Change the Main class to org.kepler.Kepler
NOTE: If you want to use a suite other than kepler, e.g. reporting, enter that suite for the Name and Project. - In the Arguments tab, add the following to the VM Arguments text area
-Xmx512m
-Xss5m
- Then click Run
11. Updating the local copy of the Kepler sources
After installation, you can use either Eclipse to update your copy of the Kepler sources by
- In Eclipse, bring up the Package Explorer with Windows -> Show View -> Package Explorer
- Select all the packages with either Control-A or Command A
- Right click and select Team -> Update.
An alternative method is to execute these commands from the command line:
cd kepler/build-area; svn update; ant update
12. Adding an actor
See Developing a Hello World Actor using the Kepler Build System and Eclipse
Problems
Problems that we've run into are listed below
Subversion client version problems
No actors in the right hand actor pane?
Syntax error, parameterized types are only available if source level is 1.5 or greater
Excluding A Directory From The Build
Subversion client version problems
If, when running within Eclipse, you see
[change-to] Svn : Checking out a working copy from a repository:
 [change-to] co -r HEAD
  svn://source.eecs.berkeley.edu/chess/ptII/trunk@HEAD
  /Users/cxh/workspace/kepler/modules /ptolemy
  --non-interactive
 [change-to] svn: This client is too --
  --old to work with working copy --
  --'/Users/cxh/workspace/kepler/modules'; please get a newer --
  --Subversion client
The problem here is that running ant inside Eclipse causes problems under Mac OS X. This problem can be
avoided by configuring the Eclipse projects by running ant outside
of Eclipse.
Lots of Eclipse Warnings
Eclipse has very good compiler error/warning. One of the warnings complains if a Serializable class does not have serialVersionUID declared. Since this warning is only useful if you are tightly managing serialization, we turn it off:
Under Windows the Eclipse Preferences window is invoked via Window | Preferences.
Under Mac OS X the Eclipse Preferences window is invoked via Eclipse | Preferences.
While in the Preferences window
- Expand Java | Compiler | Errors/Warning
- Under "Potential programming problems", change "Serializable class without serialVersionUID" to "Ignore"
- Under "Generic Types", change "Unchecked generic type operation" to "Ignore".
- Under "Generic Types", change "Usage of a raw type" to "Ignore".
- Click Apply. If you are prompted for a full rebuild, click Yes.
No actors in the right hand actor pane?
Try removing ~/.kepler and restarting. See When switching between Kepler1.0.0 and the SVN devel tree, ~/.kepler must be removed.
ClassDoc Missing
If, when compiling, the Problems pane has messages like
Severity and Description              Path                    Resource       Location Creation Time Id
ClassDoc cannot be resolved to a type core/src/org/kepler/kar KarDoclet.java line 55  1237445813337 17504
Then the problem is that tools.jar (Windows) or classes.jar (Mac OS X) is not in the build path. To determine if the missing class is in a jar file, look inside the jar file for the classname. For example, under Windows with Cygwin bash:
bash-3.2$ c:/Program\ Files/Java/jdk1.8.0_60/bin/jar -tvf c:/Program\ Files/Java/jdk1.8.0_60/lib/tools.jar | grep ClassDoc
  1032 Mon Nov 10 02:34:18 PST 2008 sun/rmi/rmic/newrmic/jrmp/RemoteClass$ClassDocComparator.class
  1374 Mon Nov 10 01:56:14 PST 2008 com/sun/javadoc/ClassDoc.class
  3140 Mon Nov 10 02:54:12 PST 2008 com/sun/tools/doclets/internal/toolkit/util/ClassDocCatalog.class
  20193 Mon Nov 10 01:56:14 PST 2008 com/sun/tools/javadoc/ClassDocImpl.class
To solve this, check that you are running a JRE from a JDK and not a JRE from a JRE by right clicking on the 'core' project, Properties -> Java Build Path -> Libraries. Make sure that you are running using a JDK, not a JRE - one of the lines should look like "JRE System Library [JVM 1.8.0 (MacOS X Default)". The key is that the JRE is from a JDK. The issue is that the JRE does not include tools.jar or classes.jar that has the ClassDoc file.
To change which version of Java is used:
Windows: Window -> Properties
Mac OS X: Eclipse -> Properties
Then Java -> Installed JREs and make sure a full JDK is selected.
Then, go back to Java Build Path -> Libraries and check that the tools.jar or classes.jar file is included.
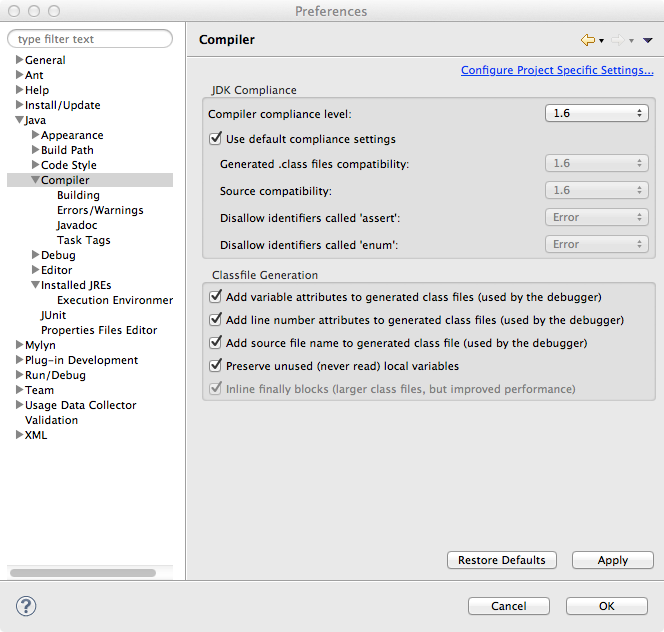
Syntax error, parameterized types are only available if source level is 1.5 or greater
As of April 2016, you must have the Java Development Kit (JDK) 1.8 installed.Try configuring Eclipse to use Java 1.8.
- Bring up the Eclipse Preferences pane:
Under Mac OS X: Select Eclipse -> Preferences.
Under Windows: Select Windows -> Preferences - Go to Java -> Compiler
- Be sure that Compiler compliance level is set to 1.8 or later.
- Click OK. You will be prompted for a complete rebuild, which is ok.
Below is a screen shot:
Excluding A Directory From The Build
To exclude a directory or file from the Eclipse build using the Eclipse UI, go to the Package Explorer, browse to the file, right click and select Build Path -> Exclude.
See also Update Ptolemy Third Party Package Dependencies.
Other Problems?
If you run into problems, see the Build System Instructions for possible solutions and then check the kepler-dev mailing list. See Contact Us for details.
See also Setting up Ptolemy II and Eclipse.
